
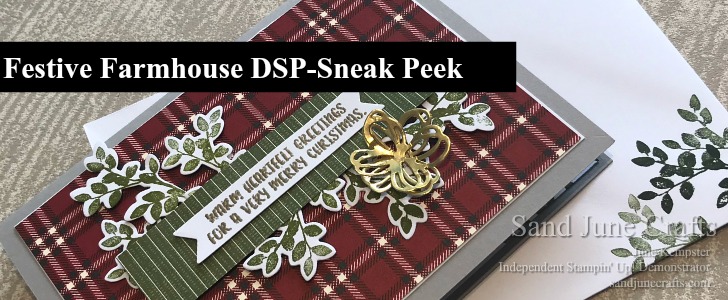
On the 5th September the 2018 Holiday Catalogue goes live and I’d like to give you a sneak peek at my favourite Designer Series Papers from this beautiful new catalogue.
Today I am sharing a card with you that features the Festive Farmhouse DSP which is part of the Festive Farmhouse Suite on page 13. I also want to show you that you can pair it up with some products from Stampin’ Up! current Annual Catalogue.
“Warm, cosy plaids and patterns for holidays and more” – Stampin’ Up!
This DSP comes in 2 each of 6 double sided designs 30.5×30.5cm (12×12″) Acid Free, lignin free.
One of the many amazing things about Stampin’ Up! is the ability to co-ordinate your printed papers with there high quality cardstock. This pack uses the Colour Collections Basic Black, Cherry Cobbler, Gray Granite, Mossy Meadow, Very Vanilla and Whisper White.
Coordinating Colours


CARDSTOCK
Gray Granite
-210x140mm Score in half to make card base
Whisper White
-130x95mm
-135x100mm card insert
-scrap card to stamp sentiment and leaf images
DSP
-128x93mm
-90x25mm
-98x30mm for card insert strip
Mount stamp onto block and using Sponge Daubers, one for each colour randomly sponge colour onto stamp image stamp onto scrap whisper white card stock creating a variegated look. Stamping 6 times leaving enough space to die cut each image.
Repeat this on the card insert and on the envelope.
On small piece of Whisper White stamp the sentiment from the Cookie-Cutter Christmas stamp set with Versa Mark then gold emboss.


Using the coordinating Nature’s Roots framelits cut out the 6 leaf images. Then using the Bunch of Banners cut out the sentiment.
To make bow/flower element use the small flower from the Sunshine Wishes thinlits, cutting 2 from the Gold Foil Sheet.
Adhere the DSP sheet to the Whisper White cardstock, then adhere to card from using Snail adhesive. Arrange the leaves, mounting some on Stampin’ Dimensionals and some using Glue Dots to create some layers. Flip over the DSP strip so the green side is facing up. Mount to card front using Stampin Dimensionals and the adhere the sentiment in the centre. Attach the Gold flower die cut outs onto each other using Glue dots. Have one angled away from the other to give a layered effect then mount onto the card front again using Glue Dots.


Adhere the card insert into the inside of the card. Trim a small slither of the DSP strip and flip over to have the green side up and attach to the card insert as pictured.
You’ll find printable card recipe with all the instructions and measurements HERE
Go to my Contact Me page and send me a message if you’d like me to pop the New 2018 Holiday Catalogue in the mail for you or you could down load the PDF version when it goes live on 5th September.
Happy Stampin’
June
Product List – Click on the image to purchase the products from my online store.
|
|
|||
|
|
|
|
|
|
|
|
|
|
|
|
|
|
|
|
|
|
|
|


